STLRepair 0.1.0

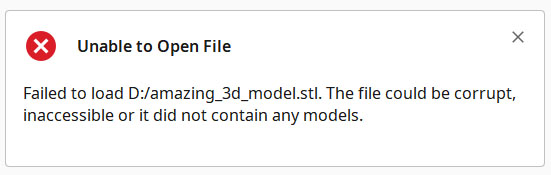
You’ve just come across a really awesome 3D model online that you just HAVE to 3D print. Maybe it’s an amazing figurine you want to use for [insert favorite table top game here]. Or maybe it’s a robotics project that you really want to build. Or maybe it’s just a cookie cutter. Who knows? Whatever the reason, it’s something you’re very excited about. You grab the files, unzip them, attempt to import them into your favorite slicing or 3D modeling tool and this is what you see…


This can be incredibly frustrating. Doubly so if you’ve paid for the model.
So many times this has happened to me. At first, I ended just deleting the files and swallowing my disappointment. But I recently came across some files that I really, really, really wanted to print. And so they motivated me to learn about the STL file format and what might be going on.

The STL file format is surprisingly simple. The binary STL format, in particular, is pretty straightforward. It contains a header and some geometry data. That’s pretty much it. That being said, the specification leaves some elbow room for exporters to take a few liberties. And they often do, which can completely baffle importers.

So I decided to create an open source tool to allow me (and you, of course) to strip away all the fluff and reduce the file to just geometry. This should allow even the most naive of importers to read an STL with no problem. I call this tool STLRepair (a truly inspired name, to be sure). Both the source and Windows binary can be downloaded from GitHub.

Source:


https://github.com/shanekirk/stlrepair

Windows Release:


https://github.com/shanekirk/stlrepair/releases/download/v0.1.0/stlrepair_0.1.0.zip

Official support for other platforms is forthcoming, most likely in the form of CMake build support. At the moment, only Visual Studio project files are included as that’s just what I happened to be using at the time.

Types of repairs supported:

  • Zeroing out problematic file headers.
  • Fixing triangle counts for files that may be corrupt or truncated from download failures.
  • Zeroing out attribute byte counts. (Not used in the spec.)
  • Clearing non-geometry data from file.

ASCII-mode STL repairs aren’t supported yet, but are on the TODO-list.

Note that this tool is only intended to repair structural problems with files. Geometry repairs are not in scope and probably never will be. There are already some great tools for that sort of thing.

If you encounter STL issues, give this tool a try. If it doesn’t help you, let me know. I can possibly incorporate a fix for your STL issue in the next version.

Building a LO-LA Night Light

When Droid Division released their 3D model of LO-LA from the Obi-Wan series last year, I immediately knew I wanted to build a night light for my kids. The following video shows how I did it.

Links of things mentioned in the video:

Droid Division Etsy Shop: https://www.etsy.com/shop/DroidDivision
M.M’s Prop Shop LO-LA Video: https://www.youtube.com/watch?v=SeBu50ekaBY
19mm Latching Push Button Power Switch w/ Blue LED – EBay
9mm Stainless Steel Tube https://www.amazon.com/dp/B081G6YCQ5
5V Power Adapter – https://www.amazon.com/gp/product/B08VWVLBWF
EDGELEC Assorted LEDs (Prewired) – https://www.amazon.com/gp/product/B07W4H66LR
14 mm Clear Glass Domes – EBay
5.5mm x 2.1mm Female Panel Mount Connector – EBay

Music Credits:

xii by Limujii https://soundcloud.com/limujii
Creative Commons — Attribution 3.0 Unported — CC BY 3.0
Free Download / Stream: https://bit.ly/3RVvJAK
Music promoted by Audio Library https://youtu.be/TCAMgPWJVHA

Track: El Verano — Declan DP [Audio Library Release]
Music provided by Audio Library Plus
Watch: https://youtu.be/S5lwvy2TN6w
Free Download / Stream: https://alplus.io/el-verano

Music: Highfly by Jay Someday is licensed under a Creative Commons License.
https://creativecommons.org/licenses/by/3.0/
Download / Stream: https://hypeddit.com/jaysomeday/highflyfreedownload
Support by RFM – NCM: https://bit.ly/3LqUBhU

Days Like This by Jay Someday https://soundcloud.com/jaysomeday
Creative Commons — Attribution 3.0 Unported — CC BY 3.0
Free Download / Stream: https://bit.ly/3uiqGk2
Music promoted by Audio Library https://youtu.be/gc2dgd6QkMA

Swimming Pool by Aftertune https://soundcloud.com/itsaftertune
Creative Commons — Attribution-ShareAlike 3.0 Unported — CC BY-SA 3.0
Free Download / Stream: https://bit.ly/38mKQ4Z
Music promoted by Audio Library https://youtu.be/nklL0k0MofA

Music | Imagine by Declan DP
License: https://license.declandp.info
Free Download / Stream: http://bit.ly/3AYUUMS
Promoted by Audio Library: https://youtu.be/UD_JCsdKH2s

3D Printed LED Bridge Lamp

Because most of my work is done in my basement, I’ve struggled quite a bit finding an adequate light source. Hands-on, detailed work, like electronics or painting, has always been an awkard exercise. I’ve tried simple desk lamps, the adjustable arm types, and even head lamps on occasion. Nothing seemed to work well for me.

Recently, however, this all changed. I came across a project on Thingiverse from a fellow named Janis Jakatis. He designed an interesting 3D printable lamp that essentially creates a 180 degree arch of LEDs that hovers over your entire workspace. I thought it was a fascinating idea and one worth trying to build.

There are three primary components involved in this build. The 3D printed bases pieces which sit on either side of your desk, the 3D printed pieces that snap together to form the arch, and the LED strips themselves.

The Arch

Janis includes two versions of the arch pieces in the project’s file set – a single piece that you can print out in one go, or a flat pack that you have to assemble after printing. The single piece will be stronger. But it also requires a LOT more filament to print to accommodate supports. So I opted to print the flat pack version.

It took some effort to figure out exactly how the individual arch pieces were meant to go together. Janis includes an assembly jig that you can use to help with this. In the end, I printed out parts for 16 separate arch pieces and then did an assembly line of sorts glueing things together with 2-part epoxy and sanding down the ends of pieces that weren’t perfectly flush.


The arch pieces are designed to snap together, but I have to confess that that didn’t work so well for me. When attempting this, some tabs completely broke off. And even those that snapped into place weren’t perfect. I can perhaps blame my Ender 3 and my print settings on much of that. So lots of 2-part epoxy was used and clamps to make sure the arch pieces were positioned correctly while the glue set.

The Base

The base has three pieces – the base proper, a middle piece that you use to customize the orientation, and a flat piece that attaches to the arch. I simply glued all of these pieces together using 2-part epoxy.

The LEDS

The LED strips are the most important component of this build. I wanted something that would be plenty bright and that wouldn’t get very hot. I am sticking them to PLA, after all. 2835s seemed like a good choice as they  balance brightness and heat much better than some of the other options. I bought a 16 ft. long strip of natural white (4000K) 2835 SMD LEDs with power supply off of Ebay for around $14.  

I cut the LED strip into two 8 ft. lengths and ran the strips parallel to each other along the underside of the arch. Like most LED strips you buy, mine already had an adhesive backing. Of course, LED strip adhesive is reknowned for being garbage. I knew this already. But I was impatient and the 3M label on the back made me a little over-confident. (AGAIN! I’ve been bitten by this in some of my drone projects. Learn from my mistakes. Don’t trust the sticky backing, regardless of what brand name is stamped onto it!) Because of this, I’ll spend the next few months with the minor annoyance of fixing random areas where the strips pull away.

(Update 2022-05-12: The adhesive on the back of the LED strips officially failed me. But I found a solution – VHB tape! This stuff is strong. A month later, the LED strips are still holding on strong.)


I should mention that Janis actually has another flavor of the arch pieces that incorporates a slot for you to insert the LED strips into and it works as a diffuser. It also requires you to print using a translucent material and 100% infill to avoid infill patterns. I didn’t go this route because I wanted maximum brightness.

With the LEDs attached, I soldered some bridge connections to reconnect the two strips together. I then plugged in the wall-wart and I was done!

Conclusion

I love this lamp. Seriously. I mean, I’m still fixing places where the LED strips occasionally pull away. I still don’t have a proper switch connected to it. And I still need to print some desk clamps that Janis included in the project files to keep the thing from the sliding around when you bump it. But I’ve already used this lamp on a few projects and it’s perfect. No more shadows. No more of my big head blocking the lamp. And it also works quite well for lighting faces for video. So there’s that.

If you need a great desk lamp and have a 3D printer (or a friend with one), give this project a shot. You won’t be disappointed.

Thingiverse Link: https://www.thingiverse.com/thing:1703104