Making Progress on the Windows Taskbar

We’ve all seen those programs that show progress on the Windows taskbar. WinRAR does it when creating or extracting RAR files. Firefox does it when downloading files. Windows Explorer does it when copying or moving files. Perhaps you’ve seen this and thought, “I wonder how I could do this in my own application.” It certainly adds polish. And as a user, being able to easily monitor a long running task while surfing the Interwebs has a lot of value. In this blog entry, I’m going to show you how to do it.

Prior to Windows 7, most applications would accomplish similar feats by manipulating window titles or system tray icons. It was kludgy. But it got the job done. Believe it or not, Windows 7 was the first version of Windows that gave us platform support for showing progress on the taskbar. It’s one of those silly little features we developers never knew we needed. After all, we thought we already had it figured out. But now that I know it’s there, I want to use it all of the time.

The key to showing taskbar progress is the ITaskbarList3 COM interface. It extends ITaskbarList and ITaskbarList2 interfaces, which are Windows 2000 and Windows XP era, respectively. As you can tell from the API docs, both ITaskbarList and ITaskbarList2 are pretty boring. It wasn’t until ITaskbarList3 showed up that things started getting interesting with the taskbar. It’s with ITaskbarList3 that we have the ability to manipulate things like overlay icons, thumbnail images, and progress, which is what we’re concerned with in this article.

(Note: If you’re a Windows developer and not experienced with COM, I strongly advise that you educate yourself on the topic. Much of the Windows platform is exposed through COM interfaces. There’s not much beyond the core Win32 API that you can do without dipping your toes into the world of COM. If you’re interested in learning more, I recommend picking up “Essential COM” by Don Box. It’s an older book (circa 1998). But it’s still the best introduction to COM and remains relevant after all of these years.)

I’m now going to demonstrate how to use ITaskbarList3 for showing progress by creating a simple wrapper class called TaskBarProgress. This is what the class declaration looks like.

class TaskBarProgress
{
    public:
 
        //! Constructor.
        TaskBarProgress(HWND hWnd) : m_hWnd(hWnd), 
            m_pTaskBarList3(NULL) {}
        //! Destructor.
        virtual ~TaskBarProgress() { _ASSERT(m_pTaskBarList3 == NULL); }
 
        //! Starts "progress mode".
        void startProgressMode();
        //! Ends "progress mode".
        void endProgressMode();
        //! Sets the current progress.
        void setProgress(ULONGLONG progressValue, ULONGLONG progressTotal);
 
    private:
 
        // We don't want the default implementations of the copy constructor 
        // and assignment operator because we have a COM pointer involved. 
        // Copying that without doing the appropriate AddRef'ing would be 
        // hazardous to our health. Let's just leave these out unless we
        // find we need them at a later date.
 
        //! Copy constructor. NOT IMPLEMENTED.
        TaskBarProgress(const TaskBarProgress &);
        //! Assignment operator. NOT IMPLEMENTED.
        const TaskBarProgress & operator=(const TaskBarProgress &);
 
        //! The window for which we're showing progress.
        HWND m_hWnd;
        //! The ITaskbarList3 implementer.
        ITaskbarList3 *m_pTaskBarList3;
};

TaskBarProgress is fairly simple. It has two member variables – m_hWnd and m_pTaskBarList3. Why do we need a window handle? When setting progress, ITaskbarList3 needs to know what window we’re setting progress on. So TaskBarProgress accepts the window handle as an argument to the constructor, which then gets stashed in m_hWnd.

The copy constructor and assignment operator are not implemented here. This is meant to keep us from shooting ourselves in the foot with COM reference count bookkeeping. For demo purposes (and probably for most practical purposes), we don’t need to support copies of this class.

The three methods startProgressMode(), endProgressMode(), and setProgress() are the interesting methods here. They do what their names suggest. When you want to begin displaying progress on the taskbar, you call startProgressMode(). As progress is made, you update the progress value by calling setProgress(). And when you’re all finished, tidy things up by calling endProgressMode().

Starting Progress

The implementation for startProgressMode() looks like so.

void TaskBarProgress::startProgressMode()
{
    if (!m_hWnd)
        return;
 
    if (!m_pTaskBarList3)
    {
        HRESULT hr = ::CoCreateInstance(CLSID_TaskbarList, NULL, 
            CLSCTX_INPROC_SERVER, IID_ITaskbarList3, (void **)&m_pTaskBarList3);
 
        if (hr != S_OK)
            return; // Not a supported platform. Nothing we can do.
    }
 
    // "Turning on" progress mode and setting the initial progress value to 0.
    m_pTaskBarList3->SetProgressState(m_hWnd, TBPF_NORMAL);
    m_pTaskBarList3->SetProgressValue(m_hWnd, 0, 100);
}

We first obtain a pointer to the ITaskbarList3 interface if we need to and verify that it was successful (this will fail on older platforms like Vista or XP). If it’s successful, we then enable the progress state with a call to ITaskbarList3::SetProgressState(). ITaskbarList3::SetProgressState() accepts two arguments – a window handle and the state flag. If you peruse the documentation for this method, you’ll find 5 different flags you can use for the state. These are described below.

TBPF_NOPROGRESS This is the normal taskbar mode. If a progress bar is present on the taskbar, setting this flag will dismiss it. You’ll notice we set this flag in our endProgressMode() method described later.
TBPF_INDETERMINATE This is what it sounds like. It means you have something going on that you want to show progress for, but you have no idea how to track a progress value for it. For example, imagine calling a third party library function that takes a long time to finish. You may not be able to receive progress notifications from it, so you have no way of knowing when it’ll be finished until it’s actually done. This is when you might use this flag.
TBPF_NORMAL Despite being called “normal”, this is actually the “in-progress” state. When you send this flag, the taskbar icon will begin showing progress.
TBPF_ERROR Turns the icon red to indicate an error has occurred.
TBPF_PAUSED Turns the icon yellow to indicate an action is needed before more progress can be made.

For this article, we’re only concerned with TBPF_NORMAL and TBPF_NOPROGRESS.

After we set the progress mode in startProgressMode(), we initialize the progress value to 0 with a call to ITaskbarList3::SetProgressValue(). This isn’t absolutely necessary, but it’s a good practice.

Updating Progress

Updating the progress value occur in our setProgress method. This method has two parameters – progressValue and progressTotal. progressValue is whatever the current progress value is and progressTotal is the maximum value the progress value can be. Both of these parameters are passed straight through to ITaskbarList3::SetProgressValue()

void TaskBarProgress::setProgress(ULONGLONG progressValue, ULONGLONG progressTotal)
{
    if (!m_pTaskBarList3 || !m_hWnd)
        return;
 
    m_pTaskBarList3->SetProgressValue(m_hWnd, progressValue, progressTotal);
}

Ending Progress Mode

Ending progress occurs in our endProgressMode() method. This method simply sets the state value to TBPF_NOPROGRESS as described above and then releases the ITaskbarList3 pointer.

void TaskBarProgress::endProgressMode()
{
    if (!m_pTaskBarList3 || !m_hWnd)
        return;
 
    m_pTaskBarList3->SetProgressState(m_hWnd, TBPF_NOPROGRESS);
    m_pTaskBarList3->Release();
    m_pTaskBarList3 = NULL;
}

Demo

And that’s all there is to it. We’ll demonstrate the use of this class with a simple console-based application (yes, consoles can have progress too!).

int _tmain(int argc, _TCHAR* argv[])
{
    CoInitialize(NULL);
 
    HWND hwnd = ::GetConsoleWindow();
    TaskBarProgress progress(hwnd);
 
    progress.startProgressMode();
    for (int i = 0; i < 20; ++i)
    {
        progress.setProgress(i, 20);
        Sleep(200);
    }
    progress.endProgressMode();
 
    CoUninitialize();
 
    return 0;
}

The first thing we do here is initialize COM with a call to CoInitialize(). You MUST do this before doing anything COM-related.

After initializing COM, we get a handle to the console window. We use that handle to construct an instance of TaskBarProgress. We then call the instance’s startProgressMode() and enter a loop that iterates 20 times. Each time through the loop, TaskBarProgress’s setProgress() method is called with the current progress value and then we sleep for 200 milliseconds. Once the the loop has finished, the TaskBarProgress’s endProgressMode() method is called.

Just before exiting, COM is uninitialized.

If you build this and run it from the console, you’ll see that the console window taskbar icon shows progress while the application is running and the icon returns to normal just before the application terminates.

Go Forth and Create Progress

The code for this article can be downloaded here. The sample was written and built using the Visual Studio 2012 Express edition. If you’re using an older platform SDK, you may need to update it in order to obtain definitions for ITaskbarList3. If you’ve included shobjidl.h and the compiler complains about missing definitions for ITaskbarList3, CLSID_TaskbarList, and/or IID_ITaskbarList3, that’s usually a good indication you need to update.

And that’s it! The ITaskbarList3 interface is pretty simple. You may not feel the need to wrap it in a class at all. That’s fine. Or you may have a better idea of how to wrap it (a scope-based progress class, perhaps?). That’s fine too. In any case, adding support for taskbar icon progress will definitely add some polish to whatever project you may be working on. Have fun with it!

-Shane

Naming Linux Threads

Here’s a quickie tip for all you C/C++ developers working on multithreaded apps in Linux. If you find yourself frequently scratching your head over which thread is which when monitoring your application using, say, top or strace, try naming your threads!

#include 

void myThreadFunc()
{
    prctl( PR_SET_NAME, "WorkerThread", 0, 0, 0 );
    // Other interesting code
}

At runtime, you can easily correlate thread names with an ID by taking a peek at /proc/[PID]/task/[THREADID]/stat or /proc/[THREADID]/stat. Just make sure your thread names are 16 characters or less (see PR_SET_NAME documentation). And it probably goes without saying, but call prctl() from within the thread you wish to name.

This little trick saved my butt the last couple of days. Maybe it’ll help you too.

DIY Guitar Fx: 4 Channel Audio Looper

For guitar players, the word “looper” usually calls to mind one of two types of effects pedals – audio samplers and signal path modifiers.

Sampler/repeating loopers record whatever the guitarist is doing for some period of time and then they loop the recording until the guitarist makes it stop. Think Loop Station from BOSS or the DITTO Looper from TC Electronic. Guitarists typically use these types of pedals to create backing tracks to play against. And while they have a reputation for being difficult to work with in a live setting or when playing with other musicians, they’re great brainstorming tools.

Loopers of the signal path variety allow the guitarist to control chains of effects. Think of an effect loop on an amp. An amp’s effects loop allows you to chain a bunch of effects together and apply them to the guitar signal after the preamp gets a chance to do its work, but before the power is applied to the signal. This prevents the preamp from noising up your effects. It also has the added advantage of allowing you, the guitarist, to bypass the effects loop altogether with the push of a single button. A pedal-based looper on its own doesn’t help you much in the post preamp department, but it does enable you to cluster effects and toggle the cluster on/off with a single footswitch press. You’re also not limited to a single pedal-based effects loop. You can have as many as you want. And because the loops themselves can be chained together, a guitarist has enormous flexibility in how they control the effects applied to their signal.

This blog entry will be concerned only with the latter type of pedal. When I say looper, I’m speaking entirely of the signal routing variety.

Motivation

I’ve got somewhere in the neighborhood of three dozen effects pedals (maybe more) in my “Box O’ Sounds”. Do I use them all? No. Certainly no more than half a dozen ever leave my practice space. But there are a number of pedals that I almost always use together to achieve a particular sound. And it’s important to me to be able to toggle them on/off together. Unless I’m super fast and feeling really coordinated, this can be really awkward. This is especially true in a live scenario where the mind can wander. Being able to treat a few pedals as a single unit is ideal. And that’s what motivated me to start exploring loopers. Once I realized how simple they were to build, I couldn’t resist trying to build one for myself.

As far as guitar pedals go, loopers are probably the easiest of all pedals to build because they don’t really modify the signal. A looper just routes the signal to different locations using a bunch of wire, switches, and jacks. They’re easy to understand. There’s almost never a circuit board mounted inside one of these things (unless you’re looking at a digital, MIDI-control unit like those from RJM Music Technology).

Materials

The following is a list of parts I used to build my looper. This listing is for four channels. If you don’t need that many channels, adjust accordingly.

  • Enclosure – I went with a 4S1032L aluminum enclosure from 4Site Electronics.
  • 24AWG single strand wire. Color really isn’t important. But I picked up some violet, red, and black spools just to help eyeball where things are going.
  • 4 3PDT footswitches (one for each loop).
  • 1 ¼” stereo jack (used on the instrument side of the pedal).
  • 9 ¼” mono jacks (1 for the amp side of the pedal and then 2 for each loop).
  • 4 5mm LEDs (I went with blue).
  • 4 LED bezels (I used to some cheap plastic LED mounting clips from Mouser)
  • 4 10KOhm resistors (1 for each LED)
  • Optional Power jack – 2.1mm is the conventional power jack size. I went with a 3 pin, panel mount barrel connector.
  • 9V battery connector.

Schematic

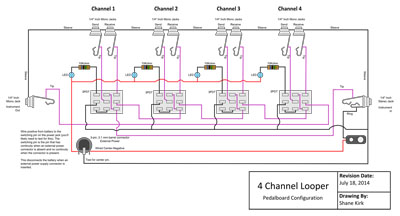
I looked around at various schematics online and ultimately created one tailored to my own needs. Below is a completely unoriginal schematic I drew based on other designs from numerous other people.

Some things worth noting:

No power is actually needed for the looper to function. Power is only really needed for the LEDs. If the battery dies or you unplug the looper from external power, you’ll still be able to use the effects loops. You’ll just have to rely on your ears to know what state the looper is in. The less I have to think about this stuff, the more I can focus on the songs. So, for me, it’s important that the LEDs work.

If you think about the switch, loop jacks, LED, and resistor as a discrete unit, you’ll realize these things are just blocks of components chained together. You can easily add or remove clusters of these to get just the right number of loops for your taste.

Pedal Design

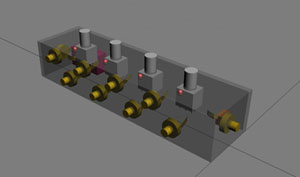
The first thing I did after getting all of my parts was to design the internal layout of the pedal. It’s important that you take some time to plan this stuff out. There are a lot of bulky components going into this pedal. It’s easy to assume you’ve got plenty of room to work with. Looks can be deceiving. I can’t stress this enough – PLAN THE LAYOUT. Enclosures aren’t cheap. And ruining a build because you’re overconfident with the drill can be really discouraging.

I did all of my planning in 3DSMax just because that’s what I know how to use. I couldn’t find a source for good 3D models of my components, so I ended up modeling them myself. I didn’t get incredibly detailed with them. I just made sure the overall dimensions were accounted for.

Enclosure Prepping

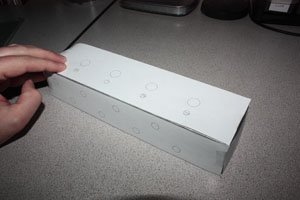
After putting together a 3D model of my parts, enclosure, and drill holes, I exported vector artwork of the various sides and brought them into Adobe Illustrator. From Illustrator, I was able to print the artwork out to scale. This became my drilling template. I cut out each side and taped them to the enclosure.

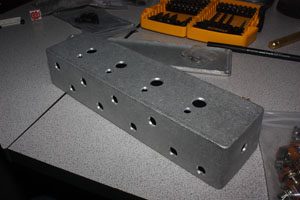
I drilled a few small pilot holes to get started and then switched to a stepped drill bit to get the right size holes that I needed. I recommend double checking the hole sizes against the components as you go just to make sure the holes aren’t too big. It’s easier to make a hole bigger. But there’s not much you can do about a hole that’s too big. A little wiggle room is ok for a jack or a switch. But too much and you’ll need to start over with a new enclosure or buy bigger washers.

With the holes drilled, you might think about sanding and/or painting the enclosure. I wasn’t too thrilled with the factory finish on the enclosures. I wanted more of a brushed look, so I sanded everything down.

I started with 80 grit sandpaper, graduated to 100 grit, and then finished with 150 grit. Since I wanted to have a brushed finish, it was important that I paid attention to the direction I sanded. If you don’t sand in a single direction, it won’t look brushed at all. I finished up with some super fine steel wool. And then cleaned everything off with some mineral spirits. After the mineral spirits evaporated, I rinsed everything off.

Wiring Up

This may seem like an obvious thing to say, but I know someone will make the mistake so I’ll say it anyway. Make sure you do you wiring and soldering OUTSIDE of the enclosure. You can periodically test fit components to make sure your runs of wire are the right length. But you’ll cause yourself major headaches if you try to solder things inside the enclosure.

Something I did that may come back to bite me is wiring my instrument-in and amp-out jacks on ends opposite to the switches they’re connected to. It was important for me to follow the convention of having the instrument-in on the right side and the amp-out on the left side of the enclosure. It was also important for me to think about the loop channels as running from left to right. So in order to accomplish that, I ended up having to add an extra 16+ inches or so of wire that I wouldn’t otherwise need if I were willing to compromise. The extra wire creates an opportunity for more noise and signal degradation. But it’s not something I’ve really noticed as of yet. If it does come back to haunt me, I’ll probably end up rewiring this thing at some point.

Regarding the LEDS, this was the first time I had ever used plastic holders. The idea is you snap the holder into the hole and then pop the LED in from the bottom. The problem is the LED isn’t held very tightly and it’ll pop out as easily as it popped in. I’m not sure how most folks deal with this, but I put a little dab of super glue around both the outside of the holder (prior to insertion) and on the outer edge of the LED (wipe off any excess that shows up on the top of the enclosure). That seemed to work ok. But time will tell how well it holds up.

Conclusion

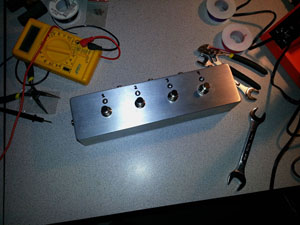
There’s not much to this project. Troubleshooting should be fairly straightforward. As you build, test for continuity along the way. Even the cheapest of multimeters can do this and it’ll save you loads of trouble.

For those new to pedal building, there are some fantastic resources online to help guide you along. Some of my favorites are below:

Planet Z – This is a website run by a wonderful fellow named John Cooper. He has SUPERB introductory video tutorials on enclosure and pedal design. He goes into much more detail than I did. He also has a fantastic tutorial on Sketchup. If you’re new to 3D modeling and are looking for a low-cost (free) way to take your first steps, Sketchup is the way to go.

gaussmarkov: diy fx – You’ll find loads of great material here on components and effects-related circuits. Gaussmarkov even took the time to create beautiful POVRAY renderings to help illustrate some of the material. I think the most valuable section here for first time builders is the Parts section.

ProGuitarShop.com – FX Loops Explained – This isn’t really a builder site. But it contains a great high-level discussion of effects loops. If you’re new to the idea of effects loops, or have always wondered what was so special about your amp’s effects loop, check out this article.

Good luck!

-Shane