Many years ago, I came across a post from someone who had
built a pit droid from wood and plaster (I’ve since lost the link to it and
Google is failing me at the moment). What the author managed to build from
scratch was astonishing. It was a static, life-sized model that could have
easily passed for a movie prop. And I suddenly found myself wanting to build
one too. Unfortunately, the author’s blog was more or less a photo stream that
showed progress at various stages and contained no drawings, measurements, or
anything else that might have helped me in my quest. Disappointed, I relegated
the idea of building my own pit droid to a “maybe someday” activity.
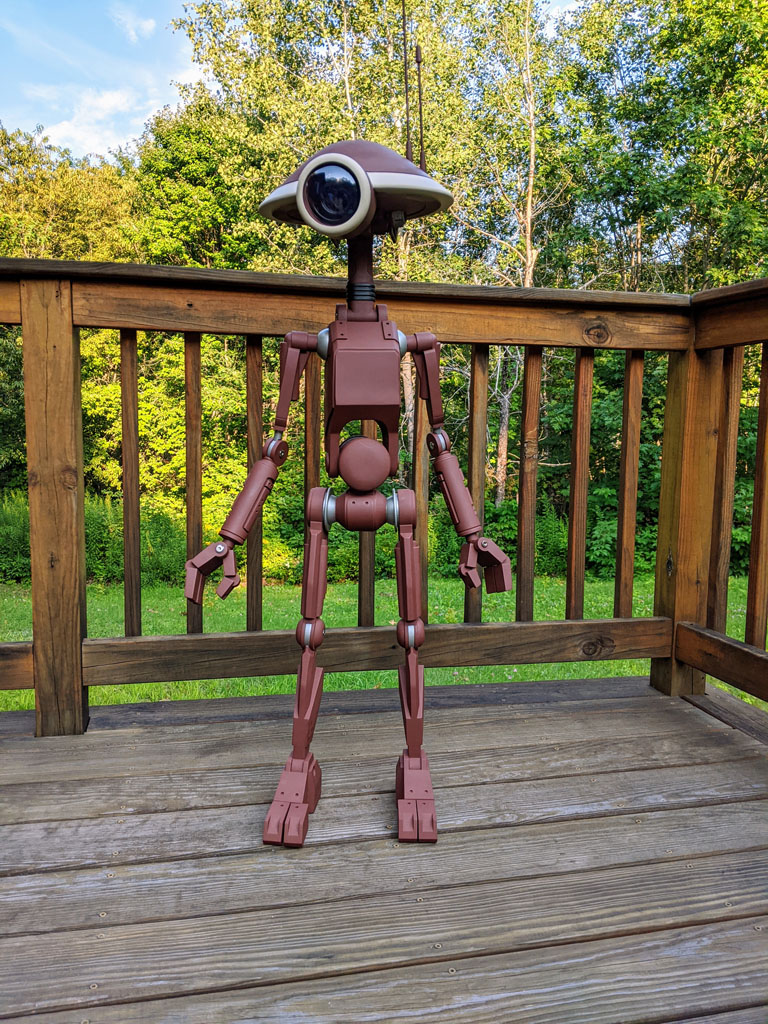
“Maybe someday” arrived late last year. While perusing the Interwebs, I came across a fellow by the name of Dave Moog that was selling a life-size 3D-printable pit droid model of his own design. It was beautiful and fully articulated, allowing for the most creative of poses. He was charging $25 for the files. So coughing up the cash was a no-brainer. I could finally build a Pit Droid! (Dave has since produced even more great Star Wars-inspired models. At the time of this writing, he even has his own Etsy shop. Visit the Droid Division Facebook community to learn more!)
Of course, now there was a problem. I had these beautiful STL files that I could drool over all day using online 3D viewers, but I had no 3D printer. And I had no experience with 3D printers.
3D Printing
 I started checking out a number of online 3D printing services. The cost of printing even the smallest of parts through these services was/is insane. It was a hard pass on them. My second thought was to check in with the local libraries to see if any of them would be able to help. Unfortunately, most of them were slow to respond. And while their fees were less than some of the online services, they still tended to be unrealistic. The Maine State Library was my saving grace, at least initially. The MSL had been working on putting together a STEM/maker space for a while. They had a set of Prusa printers itching to be used. Best of all, their fees were reasonable (we’re talking less than $10 for even some of the bigger parts). The catch? The MSL is in Augusta, which is 45 minutes away from my home and in the opposite direction of where I work. Incredibly inconvenient. But I figured I’d give them a whirl anyway.
Every few weeks, I’d send MSL a couple of parts to print and then I’d pick a day to work from there to minimize some of the pain. It was a slow process. As you can imagine it got old pretty fast. It lasted maybe two months before I got tired of trekking back and forth. And all I really managed to get printed were some feet and toes.
 At the height of my frustration, I came across the Ender 3.
This printer only cost $175 and from photos it appeared to produce remarkable
prints, comparable to some of the more expensive options. It was easy to
justify $175. So I ordered it and waited. And waited. And waited. It took a
long time to get here. So long, in fact, that I began to wonder if I had gotten
scammed. But the printer eventually arrived.
At the height of my frustration, I came across the Ender 3.
This printer only cost $175 and from photos it appeared to produce remarkable
prints, comparable to some of the more expensive options. It was easy to
justify $175. So I ordered it and waited. And waited. And waited. It took a
long time to get here. So long, in fact, that I began to wonder if I had gotten
scammed. But the printer eventually arrived.
The Ender 3 is an entry level printer, but that doesn’t mean it’s easy to use. It’s also a budget printer, which really means you have to work for your supper. That’s not really a bad thing if you’re patient and willing to learn. The Ender 3 arrives as a kit. You have to put the whole thing together. And this took me DAYS. After that, I produced garbage prints for a while as I (somewhat expensively) learned about bed leveling, infill, supports, plate adhesion, the virtue of glass beds, etc. It was a little overwhelming at first. I even began questioning whether all of this was worth it. But my stubbornness won out and I eventually got my head around it. Before I knew it I was cranking out some quality pieces.
The bed on the Ender 3 is small, coming in at 220mm x 220mm. This meant that I had to split some pieces, which required me to develop a working knowledge of tools like Tinkercad and Meshmixer (the learning never stops!).
A few months later, my pit droid parts were all printed.
Post Processing
Before I could start painting, there was some cleanup that needed to happen. A few of the split pieces needed to be glued together and the resulting seams needed to be hidden. Also, there were really bad print lines on all the parts that bothered me. And, of course, all of the parts printed using supports came out extremely rough where the supports attach. All of this needed to be dealt with.
 For gluing parts together, I opted for E6000. This glue is popular among R2 Builders, so I figured I’d give it a shot here. If you’ve never used this stuff before, it’s essentially a craft glue. It bonds various materials pretty well. It even stays strong when subjected to washing machine cycles. I think a lot of builders like it because it’s not really truly permanent. Parts can be separated later if you really need them to be. (Warning: It’s strongly advised to use a respirator when using this stuff, because the fumes are strong and dangerous.) I filled any seams with Bondo putty.
For the print lines and the rough spots where the supports attached, my workflow was as follows:
- Dry sand with 80-grit sandpaper.
- If there are any pits, gaps, or badly printed spots, repair with Bondo putty and sand again with 80-grit sandpaper.
- Apply a couple of thin coats of filler-primer.
- Dry sand with 120-grit sandpaper.
- Dry sand with 220-grit sandpaper.
- Wet sand with 400-grit sandpaper.
- Wet sand with 1000-grit sandpaper.
- Wet sand with 1500-grit sandpaper.
If that seems like a lot of work, it is. But it’s worth it. The PLA felt as smooth as glass. It might have actually been overkill to use a grit that high. But it made me feel better. 🙂
Hardware
All of the fasteners used on the pit droid are M6 furniture screws of varying lengths, along with caps and barrel nuts. The specific lengths are actually detailed in a document that accompanied the Pit Droid model.
On the back of the pit droid is a small panel that covers the hollowed out chest piece. For that, I initially used some #4 wood screws. But then I realized that it prevented me from accessing the screws for the shoulders. And that made it very hard to pose, so I ditched the screws in favor of a friction fit.
At the time of this writing, the lens is actually the top of a cupcake holder. It’s pretty flimsy, so I’ll mostly likely swap it out for something else at a later point.
The antennae are 4mm brass rods cut to size.
Painting
I used five different paints on the Pit Droid.
- Rust-Oleum Rusty Metal Primer – Yeah, not a paint. But it has the color I like.
- Rust-Oleum Black Matte Finish – For part of the neck.
- Rust-Oleum Black Lacquer – For the insides of the eye.
- Rust-Oleum Metallic Satin Nickel – For the joints.
- Liquitex BASICS Acrylic Paint, Unbleached Titanium – For the outer edge of the head and eye.

Remaining Work
What’s a pit droid without a serious amount of weathering? I’ve yet to weather him. I finished the build mid-summer and I have a few other projects that need some time “outdoor-time” (summer is short in Maine). So I’ll probably save the weathering for a winter-time activity.
Wiring. If you look closely at the pit droids in Episode I or The Mandalorian, you’ll notice some thin wires connected to the back of the arms. This is on my to-do list.
Sounds (Maybe?). There was a collection of pit droid sounds circulating on the Droid Division Facebook page. I haven’t decided if I want to use them or not. If I do, I’ll detail the electronics I use in a subsequent blog post.
Conclusion
This was a FUN project. Really. I learned a lot. And the 3D printing bug has bitten me bad. My queue of models (most of them smaller in scale 🙂 ) waiting to be printed is growing by the day. If you’d like to try building your own pit droid, join the Droid Division Facebook group and give Dave’s model a try. It’s top-notch.