In part one of this series, I talked a little bit about the Raspberry Pi and Raspbmc. I described what they were and why you might want a Raspbmc device of your own. In part two, we’re going to talk hardware. We’ll get into the specifics of what I chose to use with my Pi and why. And after having read this part, hopefully you’ll walk away with a good idea of what your own shopping list might look like. You’ll also get a feeling on how this project impacts your wallet.
The following is a breakdown of all of the hardware and peripherals I purchased for my Raspbmc project.
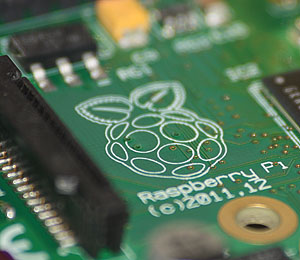
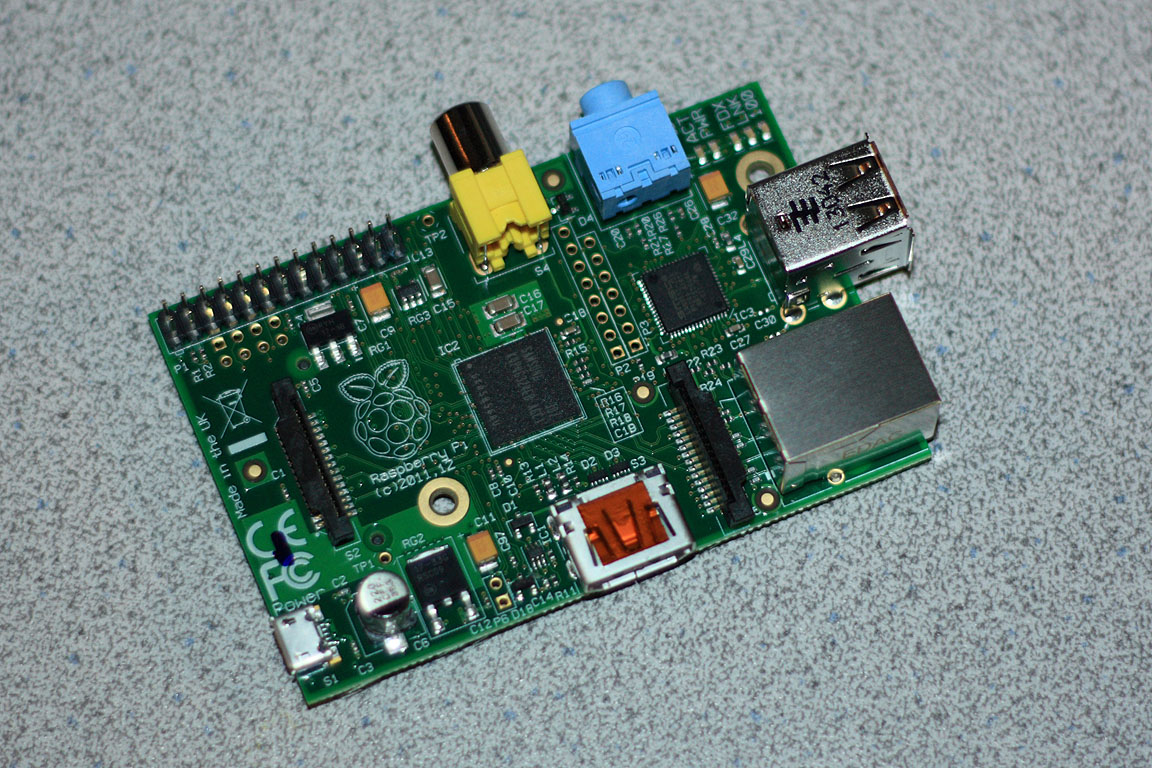 Pi – Obviously, this is the most important item to purchase. At the time of this writing, the latest version of the Raspberry Pi is the Model B Rev 2.0. It features a 700 Mhz ARM 11 processor, 512 MB of RAM, a GPU, an Ethernet port, 2 USB ports, an SD card slot, and an HDMI port. For a media center, this device is plenty capable. It can handle 1080p video without skipping a beat. I purchased my board from element14 for $35.
SD Card – You’ll need an SD card to install the OS to. And if you’re planning on storing media on the SD card as well, you should plan on purchasing a class 10 card. Class 10 is currently the highest speed classification available for regular SD cards (Note that SDXC UHS-I is a different breed of SD card and only works with SDXC devices). Class 10 is perfectly suited for full HD recording and playback. Of course, if you’re planning on streaming your content from another device, a class 10 card probably isn’t necessary. But better safe than sorry. I picked up a 32GB card from Amazon for around $24.
Power Adapter – The Raspberry Pi doesn’t come with a power adapter, so you’ll need to either salvage an old mobile phone charger or buy one. The Pi is powered over the Micro USB port, but not any ole cell phone or tablet charger will work. You’ll need a power adapter capable of delivering at least 700mA. I didn’t have any spare chargers that could provide that. So I ended up grabbing one from Amazon for $5.
 Case (Optional) – There are no real case requirements here. You can leave the Pi exposed for all the world to see. But be aware you will risk damaging your device. Play it safe and put the thing in a case. If you’re crafty, you can build your own Pi case out of everyday things. If you have a 3D printer, you can find a few case models on the Internet to print out. But if, like me, you’re neither crafty nor blessed with a 3D printer, you’ll need to buy a case. I picked up a really nice one on Amazon for $14. But you have plenty of options. Just make sure the case’s design works for your Pi. For instance, the Model A had only one USB port. So a Model A case won’t work with a Model B Pi.
HDMI Cable – For both video and audio, you’ll be doing yourself a huge disservice by using composite video. If you want HD content (and who doesn’t these days?), you can’t even do HD over composite video. Plus, there are the sound issues with the Pi. Sound over the onboard mini jack is really, really bad. Kill two birds with one stone and go straight HDMI. You can source both your video and audio over the Pi’s HDMI port. A short run (6′ or less) HDMI cable is pretty cheap. I paid $7 for a 6′ cable from Newegg.
Mouse/Keyboard (Almost optional) – A mouse and keyboard is only needed for the initial setup of Raspbmc. Once you get Raspbmc installed and configured, and assuming you have something else to control the Pi with, you can unplug the mouse and keyboard and stick them back in the closet. Something to keep in mind is that the Pi only has two USB ports. So if you’re trying to use a USB WiFi adapter at the same time as the mouse and keyboard, you’ll need to use a USB hub.
WiFi Adapter (Optional) – A WiFi adapter is optional. If you plan on streaming HD content from another computer, I actually recommend avoiding WiFi altogether and plug an Ethernet cable into your Pi. That’ll give you the best transfer speed and you’ll see less jitter or skips in your playback. But if you absolutely insist on using a WiFi adapter, consult this list of compatible adapters. Not all WiFi adapters are equal. If you already have something that’s not on the list, you’ll have to experiment with it to see if it’ll work. Mine (ENCORE ENUWI-1XN42 Wireless N150) incidentally, did NOT.
Powered USB Hub (Optional) – A powered hub is only necessary if you plan on using more than 2 USB devices or if an attached device needs to draw more than 100mA (e.g., external hard drive). They’re not terribly expensive. I picked up a D-Link for around $20. But once I installed and configured the software, I realized I had no use for it. I’ve currently got nothing plugged into the USB ports since Raspbmc is using a FreeNAS box for media storage.
IR Remote (Optional) – An IR remote is another optional component. I started off using a USB mouse to interact with Raspbmc and quickly moved to a free Android application called Yatse that runs on my Kindle Fire. I’ve been using Yatse for a while now. It’s pretty slick. But I’ve found it really inconvenient to always keep the tablet near the TV. And when I do use it for a remote, waiting the 3 or 4 seconds for it to connect to WiFi when I turn it on is kind of annoying. I ordered SANOXY remote for $14, but I haven’t received it yet. Once I get it, I’ll update this to let you know how well it works. (Update 07/30/2013 – I received my SANOXY MCE remote today. It works fantastically. The little track pad thing was an unexpected bonus. Highly recommended!) If you’re thinking about buying a remote for yourself, consult these two links [1, 2] for guidance.
And that’s about it. Here’s a total breakdown of my project’s cost. Your cost will undoubtedly vary as you determine what’s right and wrong for your own project.
| Pi | $35 |
| 32 GB SD Card | $24 |
| Power Adapter | $5 |
| Case | $14 |
| USB Hub | $20 |
| Remote | $14 |
| Total: | $112 |
Up next…software!