Creating Flat Packages in OSX

I was recently involved with a daemon-style Java project that needed a simple installer solution for OSX. We didn’t require a huge amount of sophistication from the installer. So we opted for flat packages. Flat packages are simple, self-contained files that are easy to pass around.

Prior to Leopard (10.5), packages weren’t flat at all. They were bundles, which are just folders that OSX treats in a special way. Bundles contain a variety of files. Package bundles, for example, contain files used as part of the install process such as a bill of materials, the application payload, and a collection of localized resources among other things. Previously, if you wanted to distribute one of these packages, you’d have to put the package inside a DMG or tar it up.

Another interesting thing happened during the evolution of OSX packages. PackageMaker, a wart in the eyes of many developers and source control systems, was officially deprecated and dropped in Xcode 4.6 (and there was much rejoicing :-)). Developers were left with three terminal-based utilities that could be used to build packages – pkgbuild, productbuild, and pkgutil.

For more information on the evolution of OSX packages, I highly recommend reading this MacTech article which goes into the subject in some depth.

pkgbuild

pkgbuild is a tool for creating a very basic, bare-bones component package. The resulting package will contain the payload for a single component. It also supports preinstall/postinstall scripts. And that’s about it.

productbuild

productbuild is a tool for creating a “product archive”, which is kind of like a super-package. I like to think of it as a package of packages. But it’s really so much more. You can customize the UI, as well as explicitly declare installation prerequisites such as the minimum required RAM, OS version, etc. Even JavaScript is supported for some things. If you create apps for the Mac App store, this is the tool you’ll be using to build your packages.

pkgutil

pkgutil is kind of like a Swiss Army knife for packages. With pkgutil, you can rip a package apart and then put it back together again. It doesn’t matter if it’s a product archive or a component package. If it’s a pkg file, pkgutil can work with it. It also provides a number of options for examining package contents and performing tasks like package verification and repair.

I’m going to give a quick overview on how I use these three utilities to build the flat package for our product. This approach can be adapted for your own needs.

Simple Component Packages

If you want to create a very simple package for a single component application, the easiest tool for the job is pkgutil. A complete list of options for pkgutil can be found on the man page. But here are the ones that are important.

--root – This option specifies the location of the source content you want packaged up. This can be a path containing anything. Our own application is Java-based and is nothing more than a folder of JAR files. We simply point --root to the folder containing all of our JAR artifacts.

--component – You can use this option as an alternative to --root. With --component, you’re being a bit more specific by giving pkgbuild the path to a component bundle. This might be an app bundle, a browser plugin bundle, etc. Why would you use this option instead of --root? If pkgbuild knows it’s working with a bundle, it can infer some of the other configuration options it needs, such as package identifier and install location.

--identifier – The identifier is a unique string that identifies your component. The normal convention for the identifier resembles something like a backwards domain. You start with a TLD, then follow that with a company name or developer name, and then follow that with a product name. So an identifier for Roadie Assist (not an iOS or OSX app, but could be someday) might look like “com.shanekirk.roadieassist” (this is indeed the package name on the Google Play store). There’s certainly flexibility in how you name your package IDs. They just need to be unique. But don’t deviate too much from the convention. It’ll only cause confusion.

--version – This is a monotonically increasing number. The idea is that every time you release a new version of the component, you need to increase this value. Otherwise, the upgrade process may fail. If this value isn’t set, pkgutil defaults with a value to 0. (Tip: If your build system keeps track of build numbers, consider using that as your package version. If the whole thing is automated with scripts, you’ll probably never have to think too much about this value again.)

--install-location – This is where you want to place the component on the target system. For instance, if you’ve built an application bundle, you’ll probably want to place it in /Applications on the target machine.

--scripts – Packages support a number of scripts that are invoked during the install process. If you have a script called preinstall, this will be invoked before the component is installed. If you have a script called postinstall, it will be invoked after the component is installed. The --scripts option specifies where you’re storing these scripts. The scripts can be in any language so long as the files are marked executable and have the appropriate shebang indicating the path to the interpreter. If either of the scripts return a number other than 0, Installer assumes a failure occurred and the installation halts.

A typical invocation of pkgbuild might look like so…

pkgbuild --root ./stagedfiles --scripts ./scripts --identifier com.example.myapp --version 1 --install-location /Applications mypackage.pkg

For many folks, this may be all that’s needed. From within Finder, you can double click the resulting package and component can be installed without having to do much else. If you would like to customize the UI a bit, allow for a more “componentized” installation, or distribute your application through the Mac App store, you’ll need to use productbuild.

Product Archives with productbuild

Much of what you can do with pkgbuild you can also do with productbuild. But don’t be fooled. Product archives and component packages aren’t quite the same thing. Synthesizing a distribution from a product archive (package created with productbuild), for example, will fail, but doing the same thing with a component package (package created with pkgbuild) works just fine (have no idea what I just said? Don’t worry. You will soon.) With productbuild, you can also customize quite a bit of what the end user sees. If you peruse the man page for productbuild, you’ll find that many of the command-line options you used with pkgbuild are there for productbuild as well. But you’ll also see a few other things mentioned like plugins, distribution files, resource folders, etc.

Regardless of how you created your package, you’ll probably want to update the UI or perform more sophisticated prerequisites checking. To do this you’ll need to create a distribution file.

A distribution file is just an XML file. It’s used to configure both look and feel, as well as behavior, of the package installer. The idea is that you create this file and then use productbuild to create a new package from the old one and the new distribution file. Confused yet? Let’s work through an example.

productbuild example

Let’s assume we have a package called mypackage.pkg kicking around (if you’re reading closely, you’ll notice this is the same package I use as an example above while discussing pkgbuild.). Our goal is to change the title and background image shown to the user. So we need to create a distribution file and modify it to suit our needs. Fortunately for us, productbuild is able to synthesize a skeleton distribution file for us.

productbuild --synthesize --package ./mypackage.pkg distribution.xml

Note that this only works against component packages created with pkgbuild. If you try to do this against a pkg created by productbuild, it’ll result in an error. The resulting XML will look something like the following.

<?xml version="1.0" encoding="utf-8" standalone="no"?>
<installer-gui-script minSpecVersion="1">
    <pkg-ref id="com.example.myapp"/>
    <options customize="never" require-scripts="false"/>
    <choices-outline>
        <line choice="default">
            <line choice="com.example.myapp"/>
        </line>
    </choices-outline>
    <choice id="default"/>
    <choice id="com.example.myapp" visible="false">
        <pkg-ref id="com.example.myapp"/>
    </choice>
    <pkg-ref id="com.example.myapp" version="1" onConclusion="none">mypackage.pkg</pkg-ref>
</installer-gui-script>

So far, so good. Let’s first change our package title. We want the title to be “My Example Application”. Open the distribution XML with your favorite text editor. Within the installer-gui-script element, create a new child element called “title” and set the element’s character data appropriately. It should look something like this.

<title>My Example Application</title>

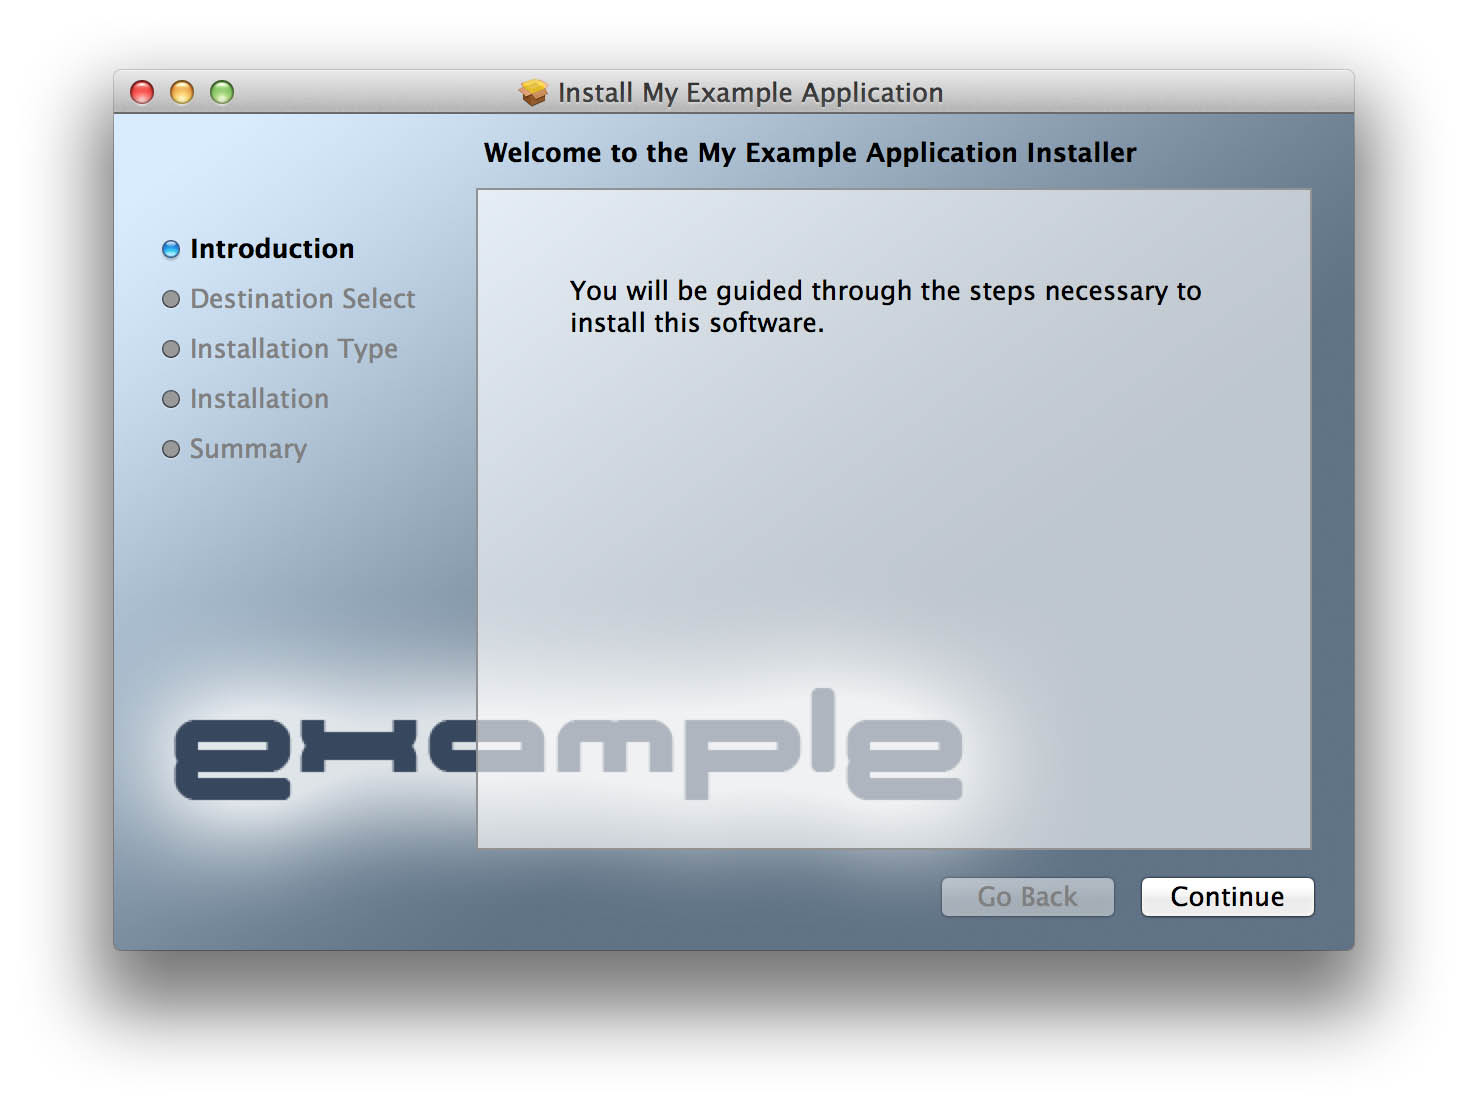
Now let’s create a new background image for our installer. The recommended size for the background image is 620×418. The background image I’ll be using for this is example is a simple PNG as shown below.

Create a new folder for your installer resources and place the image in there. We’ll call it the file background.png.

Now, let’s add the PNG reference to the distribution.xml. Open the XML file and within the root installer-gui-script element, create a new element called background. Add two attributes, one called “file” that simply names the file and one called “mime-type” that describes the image type. For example, your background element might look like so.

<background file="background.png" mime-type="image/png" />

Save your changes. Now we just need to create a new package with our modified distribution file. Using productbuild the command might look like so.

productbuild --distribution distribution.xml --resources ./myimages --package-path ./mypackage.pkg myimprovedpackage.pkg

This command produces a new package called myimprovedpackage.pkg that has the new modified background image. If you double click on it with Finder, you should see your new background image, but it should also install the new package just as it did the old one.

For a complete list of everything you can do to a distribution.xml, check out the distribution xml schema reference. You’ll find that there’s a lot of flexibility in what you can do to your packages. There are some things I always do, such as customize the welcome, license, readme pages, run JavaScript as part of the startup validation, and limit install locations to the root volume. But I’ll save discussion of those types of things for a future blog post.

Injecting Files Into Flat Packages

At some point in your journey with flat packages, you’ll find that you can’t get something into the package file that you really think should be there. This might be an extra script or even an Installer plugin (a topic that deserves its own blog entry). Both pkgbuild and productbuild promise to copy content out of the scripts or resources folders, but sometimes they just don’t. So we need to get these files into our package. That’s where pkgutil comes in.

pkgutil allows you to expand a package to a folder structure like so.

pkgutil --expand myimprovedpackage.pkg expandedcontent

This creates a folder called expandedcontent that contains the expanded content of the package. If you explore the folder structure, most of what you see will only make sense if you’re familiar with the structure of the original package bundles. I strongly advise you to read up on the history of the package format I mentioned in the beginning to be effective at shuffling stuff around within these folders.

Once you’ve got things where they need to be, then you can flatten everything again like so.

pkgutil --flatten expandedcontent myimprovedpackage.pkg

Conclusion

And that’s it. I realize I glossed over a lot of interesting stuff with regards to the distribution XML file. Experiment with it. I hope to write a followup to expand on some of these topics in closer detail. If you have questions, post them!

Building a Home Media Server with Raspbmc: Part Four

If you’ve been following along with the last few blog entries, you should have a pretty good idea of how to build a Raspbmc device for cheap (What’s Raspbmc? Click here to start at the beginning.) Maybe you’ve already built one. And maybe it’s already achieved family-member status. 🙂 If so, congratulations!

In this last installment, I’m going to talk about enhancing your Raspbmc experience. I’ll also discuss some of the issues I had along with their solutions.

The topics presented below are in no particular order. It’s really more of a collection of Raspbmc recipes. So feel free to scan down the list until something catches your eye. And if you have a tip that doesn’t appear here, please leave a comment!

Fickle HDMI – When I first began using Raspbmc, the HDMI connection was a real pain. I’d finish watching one of my favorite movies, turn the TV off, and then return later to watch something else. Once I turned the TV back on, Raspbmc was nowhere to be seen. My only recourse was rebooting the Pi by unplugging it and plugging it back in. Not only was this inconvenient, but also extremely clumsy. Not shutting down Raspbmc properly before yanking the power can damage the filesystem.

If you experience this problem, the solution is to modify the /boot/config.txt file. Simply SSH into Raspbmc (User: pi, Password: raspberry) and edit /boot/config.txt using your favorite text editor. Add the following two lines at the end of the file.

hdmi_force_hotplug=1
hdmi_drive=2

Then save and reboot.

Setting hdmi_force_hotplug to 1 forces Raspbmc to use HDMI even if the TV or monitor isn’t detected. The other setting, hdmi_drive, controls the mode that HDMI runs in. Setting it to 1 forces Raspbmc to use DVI mode, which is merely HDMI without sound. This is NOT what we want. Setting it to 2 forces Raspbmc to use normal HDMI mode, which includes sound. This IS what we want.

Hulu/Netflix/Amazon Playback – One of the things that attracted me to Raspbmc was the ability to stream content from providers like Hulu. I had read about the Free Cable add-on from the Bluecop repo before starting the project. Free Cable is an XBMC add-on that allows you to stream content from both paid services (e.g., Hulu, Netflix, Amazon, etc.) and networks that make their content available online for free (CBS, Fox, etc.). So I tried it. And my experience with Free Cable was less than spectacular. Not only was it incredibly slow. But for many media sources, such as CBS, HGTV, etc., it simply didn’t work.

The solution for my woes wasn’t a Raspbmc add-on, but a desktop application called PlayOn. PlayOn is an application that acts as a middleman for streamable content. You install it on a PC and then supply it with credentials for whatever streaming services you use. It accesses content on behalf of Raspbmc and then restreams it. It’s fast. It’s simple. And it works.

At the time of this writing, PlayOn costs between $8.99 and $59.99 depending on your needs and budget. At the low end, they offer subscription model. At the high end, you can purchase a lifetime license.

A word of caution. To use PlayOn with Raspbmc, you MUST ALSO purchase the MPEG-2 license from RaspberryPi.com. Otherwise, Raspbmc won’t be able to decode PlayOn’s video stream. I didn’t realize this at first and all I got from PlayOn was audio.

When you purchase the MPEG-2 license, I suggest SSHing in to Raspbmc and adding it to the /boot/config.txt file using your favorite text editor. Just open up the /boot/config.txt file and paste the lines they instruct you to copy from the email you receive. Then reboot. Alternatively, you can enter the keys using the Raspbmc Settings program. But if you do, you’ll probably lose any custom settings you’ve added to the config.txt file, including the HDMI settings I mentioned above.

To use PlayOn with Raspbmc, you’ll need to add a uPnP video location. Start PlayOn from your PC, hop over to your Raspbmc device, and then navigate to Videos->Files->Add Videos. Click the Browse button and then select uPnP Devices. The PC running PlayOn should show up in the list. If it does, select it. If it doesn’t, check that your PC’s firewall isn’t blocking uPnP traffic. Once you’ve added the PlayOn source, you can use it by navigating to Videos->Files->PlayOn. I haven’t figured out a way to put PlayOn on the main Raspbmc menu. So if someone knows, please tell me how in a comment below.

Subtitles – The first time I curled up on the couch and started watching an English speaking movie with subtitles, I just about lost my mind. I couldn’t figure out how to shut them off. If you look around in the system settings you’ll find there isn’t a single subtitles on/off setting anywhere.

The trick to fixing this starts with playing a single video that contains subtitles. Press the “OK” button on your remote to pop up the On Screen Display. Then press the right button until the little speaker icon is selected. Press OK again. This will pop up the audio settings for the current video. If you scan down the list of options, you’ll find one called “Disable Subtitles”. Turn it off. And then at the bottom of the menu there will be another option called “Set as default for all videos”. That is the secret sauce. Select that and subtitles will be disabled globally. For videos that you need subtitled, you can navigate back to this menu to turn them back on for that single video.

Remote Updating/Cleaning – We store the bulk of our media on a FreeNAS box in a part of the house that’s about as far away from the TV as you can get. The computer I usually use to maintain our collection is just as far away. A common chore for me was having to fire up Raspbmc’s web based remote control to clean and update Raspbmc’s video library.

Raspbmc actually features a pretty slick JSON-RPC API. It’s what enables applications like Yatse to work as a remote control. Since it’s web based, you can also use it to do tasks like library cleaning and updating through your browser. I created bookmarks in my browser to make these sorts of tasks quick to do.

If you’re curious as to what services are available, here’s a link to the docs for Version 6 of the API. My favorite calls, and the ones I have bookmarked in my browser, are as follows. To use them for yourself, you’ll need to change the IP address to point to your own Raspbmc device.

This will update your video library.

http://pi:raspberry@192.168.0.7/jsonrpc?request={"jsonrpc":"2.0","method":"VideoLibrary.Scan"}

This will clean dead content from your video library.

http://pi:raspberry@192.168.0.7/jsonrpc?request={"jsonrpc":"2.0","method":"VideoLibrary.Clean"}

This will update your audio library.

http://pi:raspberry@192.168.0.7/jsonrpc?request={"jsonrpc":"2.0","method":"AudioLibrary.Scan"}

This will clean dead content from your audio library.

http://pi:raspberry@192.168.0.7/jsonrpc?request={"jsonrpc":"2.0","method":"AudioLibrary.Clean"}

File Management – When you select a folder as a media source, Raspbmc gives you the option of selecting that folder’s media type (TV or Movie). So you’ve probably already figured out that it’s best to have separate folders for your movie and TV content. What you might not have figured out is how your files should be named.

Raspbmc is extremely smart when it comes to file names. If you have a file named “Night.Of.The.Living.Dead.720p.mkv”, for example, it’ll be able to parse out the name and find it in the Movie Database. On the other hand, if you name the file “NOTLD.mkv”, Raspbmc will have no idea what the file is and you’ll probably not see the title show up in your movie library. So make sure you’re smart with your naming. If Raspbmc doesn’t add a title to the library, chances are it couldn’t parse the name or it couldn’t find it online. This also includes titles with accented characters. For instance, Raspbmc won’t be able to find “Les.Miserables.mkv”, but it will find “Les Misérables.mkv”.

I prefer to keep separate folders for each movie or TV show. For TV shows, you can also create subfolders, one for each season. For instance, underneath your TV folder, you might have a folder for “The Office (UK)”. And inside that folder you might have two folders, “Season 1” and “Season 2”, each of which contain the files for their respective season. If you follow this scheme, make sure you turn on the setting for “separate folders for content” when you add your content source in Raspbmc

Another cool thing about having your content in separate folders is that you can control the artwork that Raspbmc displays for a given title. You just need to deposit one or more of the following files in the same folder as your content.

fanart.jpg Background image. See the movie database or TV database for examples.
poster.jpg The poster that’s displayed for a given title. See the movie database or TV database for examples.
banner.jpg Banner image. I’ve only see this used in 3rd party remote control applications, like Yatse. See the TV database for examples.
thumbnail.jpg The thumbnail used for a given title. This is usually automatically extracted by Raspbmc and can take some time. Supplying it can save Raspbmc a bit of trouble.

Audio – I mentioned this in part 3, but it bears repeating one more time. Don’t use the mini-jack for your audio. You’ll just be subjecting your ears to bad stuff. Turn the audio-over-HDMI setting on and configure it appropriately for your home theater.

Remote Controls – If you haven’t ditched the mouse to control Raspbmc, you should. If you’re an Android user, check out Yatse. It’s a great remote control app you can use on whatever WiFi enabled Android device you have. I used this for a long time on my Kindle Fire before I got annoyed with the amount of time it took to establish a WiFi connection. I then dropped a whopping $14 on a SANOXY remote and never looked back.

Video Podcasts – One of my favorite things to watch on the Pi are video podcasts, such as those from Leo Laporte’s TWiT network. I really wanted to be able to automatically download shows as they were made available. And fortunately, the TWiT network features an RSS feed for video.

For TWiT’s “All About Android”, I wrote a bash script that looks like the following. Keep in mind that this is script runs as a cron job on an older FreeNAS box. Depending on what machine you use, you may have better regex facilities available to you. If you choose to use this script, you’ll need to adapt it to your environment and podcast source.

#!/bin/bash
 
cd "/mnt/Public/Media/"
wget http://feeds.twit.tv/aaa_video_hd -O feed.xml
 
# The version of grep that comes with FreeNAS doesn't support the -P option and Perl
# isn't installed. So we make do with what we've got.
LINKS=(`cat feed.xml | tr '\n' ' ' | grep -ho "<link>[^<]*" | grep -ho "http:.*.mp4" `)
LATESTLINK=${LINKS[0]}
 
FILENAME=`echo $LATESTLINK | grep -ho "[^/]*$"`
 
# We need to mangle the filename a bit to play nice with Raspbmc.
VERSION=(`echo $FILENAME | grep -ho "[^a0_]*_" | grep -ho "^.*[^_]"`)
FILENAME="All.About.Android.S01E${VERSION[0]}.mp4";
FILENAME="./TV Shows/All About Android/$FILENAME"
 
echo "Latest Link: $LATESTLINK"
echo "Destination File: $FILENAME"
 
if [ -f "$FILENAME" ]; then
    echo "File exists. Nothing to do.";
    rm feed.xml
    exit 1;
fi
 
rm feed.xml
echo "wget $LATESTLINK -O \"$FILENAME\"";
wget $LATESTLINK -O "$FILENAME"
 
# Telling Raspbmc to update itself.
wget "http://pi:raspberry@192.168.0.7/jsonrpc?request={%22jsonrpc%22:%222.0%22,%22method%22:%22VideoLibrary.Scan%22}" -O /dev/null

Reclaim SD Card – Perhaps you’ve decided to replace or upgrade your SD card. Or maybe you’ve had enough of Raspbmc and you’re moving on to something else like Openelec. In either case, you’ll want to reclaim and reformat that old SD card to something your PC can use again.

To do this you’ll need the tool that started us down this road way back in the beginning – the Simple UI installer.

Fire up the installer and you’ll be presented with this familiar window.

Simply select the SD card and click the “Restore device for formatting” button. It does its work pretty quickly. Once it’s finished, you’ll still need to format it.

The SD card should now show up in Windows Explorer. From there, you can right click on the card and select Format.

Conclusion

Those are all of the Raspbmc tricks up my sleeve. If you have any tips of your own, please leave them in a comment below. Good luck!

Building a Home Media Server with Raspbmc: Part Three

In part two of this series, we discussed hardware options for the Raspberry Pi. By now you should have a pretty good idea of what needs to be bought and what can be scavenged for your Raspbmc project. This is the part in the series where the rubber meets the road. I’m going to talk about where to get Raspbmc, how to install it, and what to do after it’s up and running. By the end of this article, you’ll be able to enjoy your media collection on your new Raspbmc device. So let’s get started.

First Steps

An SD card serves as primary storage for the Raspberry Pi. It’s where we place the operating system. And it often, but not always, serves as general purpose storage. Our first task is to get Raspbmc installed on an SD card.

Raspbmc can be downloaded for free from raspbmc.com. Click on the “Download” button at the top of the Raspbmc site. This link will take you to the download page. Here you’ll find a few options.

Simple UI Installer – This is the easiest way to take your first steps with Raspbmc. The UI installer is a small tool for initializing the SD card. It deposits a few files on it for bootstrapping the Raspbmc download and install process, which actually happens on the Pi. It’s available for Windows, OSX, and Linux and it’s extremely painless. If you think you might ever want to reclaim the SD card for another use, this tool also provides a nice “Restore device for formatting” option that puts the card back into a formattable state.

Network Image – This is a minimal disk image that’s not unlike the image used by the Simple UI Installer described above. It’s a barebones OS configured to download and install the rest of Raspbmc at first boot. Use this if you’re on an OS not supported by the UI installer. You will, however, need a disk imaging tool to write the image to an SD card.

Standalone Image – This should be used if your Raspberry Pi is Internet-challenged. It’s the full blown Raspbmc image and doesn’t require any network access for the install process. To write this image to an SD card, you’ll need a disk imaging tool. A popular one for Windows is Win32DiskImager (Disclaimer: I haven’t actually used Win32DiskImager with Raspbmc images, but it should work. If you try this, let me know if it’s successful.)

From here on out, I’m going to assume you’ll be using the Windows UI installer.

Installing Raspbmc

Before launching the UI installer, plug your SD card into your PC. When you fire up the Windows-based installer tool, you’ll see a window that looks something like so.

The Raspbmc Installer will scan your machine for removable devices on startup. If you plug in your SD card before firing up this utility, you should see it appear in the list. If it doesn’t show up, try restarting the installer. If the SD card still doesn’t appear after a restart, check to see if Windows sees the SD card. You may have bigger problems.

When selecting the device to write to, double-check and triple-check that you select the device that correctly corresponds to your SD card. Selecting the wrong device could be catastrophic to your PC, your data, and even your mental health.

The only other required checkbox here is “I accept the license agreement”. The other checkboxes do what they sound like.

If you plan to use DHCP with Raspbmc, don’t worry about the “Manually configure networking option”.

The “Install Raspbmc to a USB drive” option will allow you to install Raspbmc to another USB storage device plugged into the Pi. This could be another SD card entirely if you’re using a USB card reader/writer. But you’ll still need an SD card to bootstrap the install process, which will be the card you’ve selected in the installer.

Once you’re satisfied with your selections, hit the “Install” button. It’ll only take a few seconds to do what it needs to do. And after it’s finished, you’ll have a bootable SD card you can plug into your Raspberry Pi.

Raspbmc Setup First Boot

Once your SD card is all set, you’re ready to proceed with the rest of the Raspbmc installation. Before you go any further, make sure your Pi is powered OFF. Plug in your network cable, HDMI cable, mouse, and keyboard. If you want to use a remote control or WiFi adapter, leave them unplugged for now. Don’t worry. We can set those up later. Slide in your SD card and power up the Pi. Note: Plugging in peripherals while the Pi is on is generally a bad idea. Every time I’ve done this, my Pi has either locked up or rebooted. Consider yourself warned.

The very first time you boot from the Raspbmc SD card, you’ll see a screen that looks like so.

The installer’s version of Linux will then boot. This is where hardware and network detection occurs. If there’s a problem with either of these, you’ll see an error displayed here.

If all goes well, you’ll eventually reach a blue screen that displays a message like the following.

This is the point in the process where the meat of Raspbmc is installed. This part can take a while, typically somewhere between 20-30 minutes. It’s all automated. So feel free to go grab a coffee or a beer while all this is happening. But I suggest that you poke your head in from time to time to see what’s going on. The first time I installed Raspbmc, the device locked up during a reboot. I had to manually power cycle the device to make the install continue.

There are a number of things that happen during this process. Partitions are created and formatted, software gets downloaded, kernel modules are installed, etc. If you have the patience to watch the whole thing, you’ll notice the device even reboots a few times. The crude Linux text-based boot process will eventually transition to a much nicer boot splash screen.

After 20-30 minutes and one final reboot, Raspbmc will start.

Configuring Raspbmc

When Raspbmc boots for the first time, you’ll be asked to select your language of choice.

Using your mouse, select an appropriate language.

Raspbmc uses a time server to figure out the current time, but it can’t figure out your timezone automatically. So you’ll need to set this. The timezone setting isn’t in an obvious location. I actually spent a number of days staring at the wrong time, until I found the setting. You can find it setting under System->Appearance->International->Timezone.

If you’d like to tweak your video settings, you can make changes under System->Video Output. I’ve been using my own device at 1080p without any problems. But others have reported a significant performance boost in the UI by switching to 720p. I recommend trying to use your device at 1080p. That way if you decide to switch to 720p, you’ll at least be able to gauge the significance of the performance boost.

Audio settings can be changed under System->Audio Output. This was one of the settings that I struggled to get right. For a short while, I used the mini jack connected to a stereo input on my audio receiver. Nothing I changed resulted in good audio. After a little Googling, I discovered many, many Raspbmc users complaining of noisy audio over the mini jack. I don’t know if it’s a hardware issue or a driver issue, but something isn’t quite right. The best thing to do is to set your audio output to HDMI. You’ll probably need to experiment with the rest of the settings to find a configuration that works best for you. My TV is currently connected to my audio receiver in stereo using RCA cables. So I set my speaker configuration to 2.0 and turned on “Output stereo to all speakers”. I turned off the “boost volume level” because I didn’t want any other audio processing occurring on the Pi. This resulted in the best sounding audio for my setup. This may take some tweaking to find a configuration that works best for you.

If you have a remote control or a WiFi adapter, this is probably a good point in the process to get those working. Before plugging anything into the Pi, you should power it down. Using your mouse, click on the power button in the lower left hand corner of the screen and select “Power off System”. Once the device has shut down, you can safely unplug your keyboard and mouse and stick them back in the closet. Plug in your IR receiver and/or WiFi adapter and power the Pi back up by unplugging it and plugging it back in. If your devices are compatible with Raspbmc, they should be detected automatically.

And that’s it! Your Raspbmc device is ready for use.

Adding Media

By now you’re probably itching to get some media playing on your device so you can see Raspbmc in action. Let’s try adding one of the great classics – “Night of the Living Dead”.

Fun fact: Due to a an error by the original theatrical distributor of “Night of the Living Dead”, the movie entered the public domain almost immediately after it was released. Public domain means it’s free to copy, free to modify, and free to distribute. There are well over 40 versions of the film for purchase from Amazon. Fortunately for us, a fantastic 1080p version of the film is available for free on Archive.org. It can be downloaded HERE.

What’s needed is a location that Raspbmc can use to source video content. This can be another hard drive, a shared drive from another computer, or even a location on the SD card plugged into the Pi. I have a FreeNAS box on our home network that offers up a CIFS share (AKA a Windows share) for content. So that’s what I’ll be using here to illustrate the process. But if you want to put content right on the SD card, the easiest way to do that is to upload it using FTP (Username: pi, Password: raspberry). If you decide to go this route, I hope you heeded my advice in part 2 about getting a class 10 card.

From the main menu, select “Video”. You’ll see a menu that lists three items – Files, Playlists, and Video Add-ons. Select “Files” and then on the next menu select “Add Videos…”. This will present you with the following dialog box.

Click on the “Browse” button and you’ll presented with another dialog box that looks like so.

The list on the right represents all of the different storage/streaming types that Raspbmc supports for video content. If you used FTP to upload content to the SD card, select “Home Folder” and navigate to the location where you uploaded your content. If you’re using a CIFS network share, like me, scroll down through the list until you find SMB shares. SMB is an older name for CIFS. From here you can point Raspbmc to the computer and folder containing the content.

You’ll notice that you can also specify the type of video content this location contains. This will allow you to tap into one of the neatest features in Raspbmc. By indicating that a given folder contains TV shows, for example, Raspbmc will use the Online TV Database to fetch all sorts of information on the shows contained in that folder. This includes ratings, synopsis, actors, and, best of all, fan art and posters which will be displayed in Raspbmc. A similar thing happens with movies, the data source being The Movie Database.

After you select the folder, Raspbmc will scan its content and download fanart for media it can find online. The video content will then appear in your library. Highlight a movie in the menu and you’ll see its fanart appear on the screen, assuming Raspbmc was able to find it online.

Regarding MPEG-2 (DVD video) and VC-1 content, media of these types aren’t playable on Raspbmc without the appropriate licenses. But both licenses are dirt cheap and can be purchased from the Raspberry Pi Foundation. Adding the licenses into Raspbmc can be done in Programs->Raspbmc Settings->System Configuration->Advanced System Settings.

I’m not going to bother to explain the process for adding photos or music as it’s pretty much the same as adding video. If you’ve successfully added video to your device, you should be able to just as easily add other types of content.

Conclusion

At this point, you know enough to get started with Raspbmc. But we’re not done yet. In part four, we’ll talk about some of the issues I encountered after using Raspbmc for a few days, along with some ideas and tricks to make your Raspbmc experience much more fun. In the meantime, explore Raspbmc. Try out some of the settings and add-ons. You can’t break anything. The worst that can happen is you’ll need to reinstall Raspbmc. And now you’re a pro at that. 🙂

Good luck!